Tuesday, October 30, 2012

sugar skull makeup

Hey everyone! So on Saturday I was superrrrr ambitious and did sugar skull looks for all of us to go to a Halloween party. I did 4 sugar skull looks (including myself) and it took me roughly 10 hrs. I started applying the makeup at 11:30 am and finished everything at about 9pm.

IT WAS INSANE.

I had a set time schedule for everyone so I could have enough time to complete each look. The schedule was as follows:


  • Deej: 10:30am - 1pm
  • Joe: 1pm - 3:30pm
  • Myself: 3:30pm - 6pm
  • Chris: 6pm - 8:30pm
That schedule gave me 2 1/2 hours per face so I could take my time but we all know nothing goes as planned.

First let me explain to you what I call "DJ Time". When you're running on DJ Time it pretty much means you're running late. The title came about when I started hanging out with Deej and he could never be on time for anything! It wasn't on purpose, I believe he said it was because he procrastinates easily. I would invite him over to hang out at 1pm and he might show up around 3-4pm, haha. Lately, he's been on his game and I haven't used the phrase much anymore but let me get on with the story...

If ever there was an awful day for DJ Time, this was it. And sure enough, Deej sleeps in. Hahahaha. Now I can't blame him because it was his day off and he works a bunch of hours, and granted I didn't specify a specific time until the last minute, but I DID say in the morning.

So I'm texting him from about 9:30am until 11am and I get a text around 11:30am from Deej saying he just woke up and had something to do quickly. What happens next? Joe swoops in like a champ and decides to go first. I didn't put Joe first on the schedule because he works every Saturday until 10am and I was going to let him take a nap when he got home. So sacrificing his sleep, Joe saved the day!

Deej showed up a little after 1pm but all went well :)

Now that I'm done boring you, I'll get on with the pictures!

WARNING: There will be beardless men in these photos.


First I covered the brows using the glue stick method. I then used Ben Nye's Clown White to cover the entire top half of the face. Next, using a light colored eye pencil, I outlined the shape I wanted for the eyes.


Now I took a cream base and filled in the entire area of the eye. This helps the eyeshadow I'll be using to last longer and stick to the skin. When using the glue stick method, the brows harden and are a little tough to work with so that's why some white is still showing through.

(He's so handsome!)

Now apply the color of choice all over the eye area. 


To make the eyes get a more hallowed effect I added black eyeshadow in the middle of the red and blended it out. After applying all the color to the eyes I finished adding the Clown White to the face and   set it with a white powder.


Next comes the dots around the eye and the nose. Since I had so many faces to decorate, I kept things simple and just did plain ol' black dots and a very simple nose design. You can do whatever you want though! Big petals, little petals, fancy nose design, whatever!


To tie everything together, I contoured the cheeks and did a grungy looking teeth set using black gel eyeliner. Joe didn't want any decorations but he looks mighty fetching either way right!?

(TA DAAAAA!)

Here's a bonus picture of Deej:

(He has some serious eyebrows!)

That's everything. I basically just repeated the steps until my fingers fell off but it was all so worth it.


I think we looked awesome. We all had the same basic makeup layout but different color schemes and designs. On our way to the party we stopped at 7/11 and some guy asked if he could have a picture with all of us. He had his daughter with him and she was so distracted by our faces that she didn't look at the camera, haha. 

Anywho, here's some more photos:

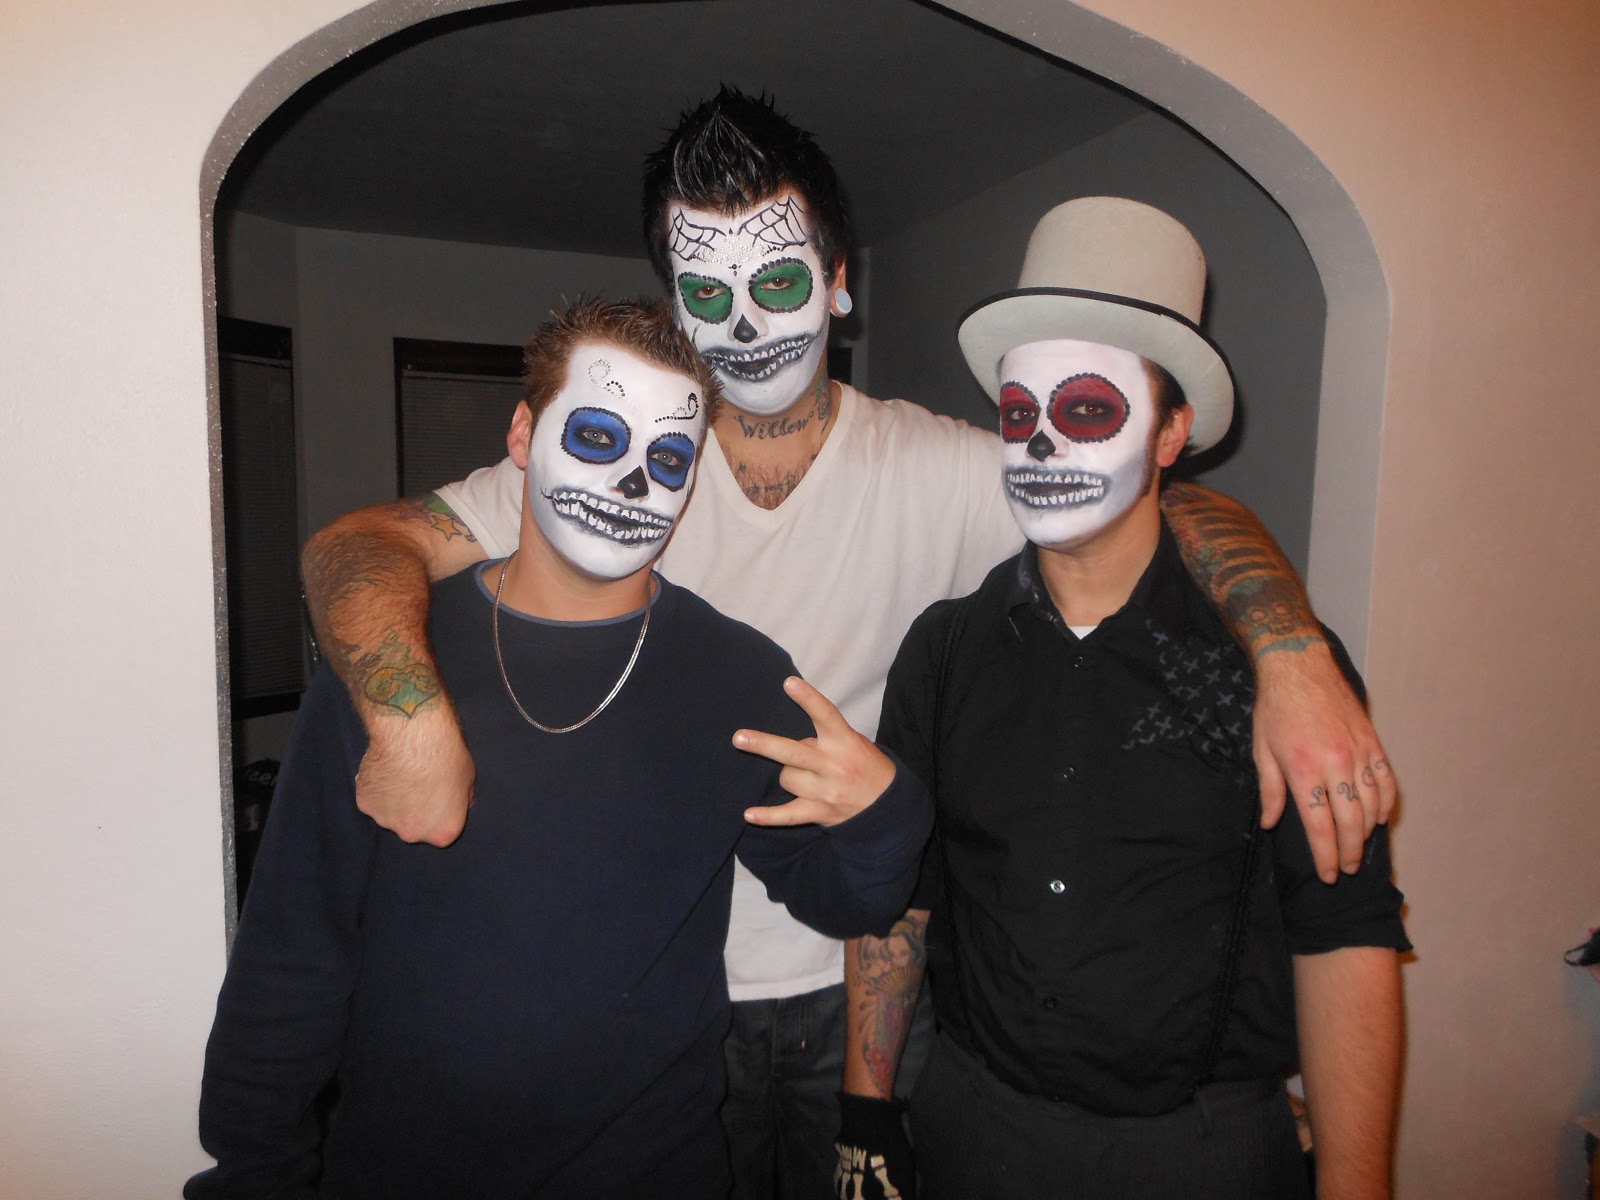
(My fellas. Deej is pinching Chris' nipple, haha.)

(My two favorite guys!)

(Even skeletons can love. Open your eyes Joe!)

(At the party. We pretty much had the best costumes there.)

And that's everything. I hope you enjoyed this post. Comment below and tell me what you think. And remember, if you haven't already liked my Facebook page, please do!


What are your Halloween costume ideas? Let me know!


Ciao!


Products used:

  • Ben Nye "Clown White"
  • Ben Nye "Super White" face powder
  • Sugarpill Cosmetics pressed eyeshadow "Love +"
  • Sugarpill Cosmetics pressed eyeshadow "Midori"
  • Sugarpill Cosmetics pressed eyeshadow "2am"
  • Sugarpill Cosmetics pressed eyeshadow "Velocity"
  • Maybelline eye studio gel liner "Blackest Black"
  • Urban Decay 24/7 glide on eye pencil "Perversion"
  • L'oreal infallible eyeshadow "Eternal Black"
  • Maybelline color tattoo eyeshadow "Tough As Taupe"
  • Avon glimmersticks brow definer "Dark Brown"

Monday, October 29, 2012

Liebster blog!

I have been awarded the Liebster Blog Award by Jen Tea


Thanks a lot Jen!

So if you're like me and don't know anything about this award, here's what I've gathered from mild research and common sense:

The Liebster Award is a sort of DIY award, it's a blog "award" for bloggers with less than 200 followers. This award is a way to bring notice to up-and-coming bloggers and get them more readers and followers. Pretty much, its a method to bring the blogging community together. 

The rules go as followed:
  • Post 11 random facts about yourself.
  • Answer 11 questions from the person who awarded you (you can receive multiple awards).
  • Award 11 other blogs the Liebster Award and tell them you awarded them.
  • Ask the blogger you award 11 questions.
  • You're not allowed to award the blogger(s) that awarded you. 
  • Follow the blog you're awarding.
  • Follow the person who awarded you.


11 Facts About Myself:
  1. I am German, Polish, Thai, Pakistani and Chinese.
  2. I can speak Laos but I'm not 100% fluent (I know enough to get me by).
  3. I was born in Salem, MA.
  4. I'm an aspiring novelist.
  5. I think whiskey is delicious.
  6. I smoke cigarettes.
  7. I have a small fascination with the 19th century.
  8. I scare easily.
  9. I prefer cats over dogs (though I love them both).
  10. I absolutely love George Clooney.
  11. One of my favorite foods is pho.


11 Answers to Jen Tea's Questions: 
  1. What's your one favorite beauty product?
    My Sugarpill Heartbreaker palette.
  2. Where would you live if you could live anywhere in the world?
    There are a lot of places I'd love to see and visit but I've never been anywhere out of the US aside from Canada. Though if I had to choose right now, I'd probably pick London, England.
     
  3. What do you love to watch on Youtube?
    I love watching music videos, makeup tutorials and "fail" videos.
  4. What makeup look do you prefer? Natural or smokey/dramatic/colorful?
    I like a lot of variation when it comes to makeup; my favorite look depends on my mood! Lately I've been loving the simple, colorful look.
  5. What movie are you looking forward to?
    The Hobbit.
  6. What's your favorite holiday?
    Christmas (not just for the presents).
  7. What's your favorite book? Why?
    Pride & Prejudice by Jane Austen. I really like stories and movies based in the 1800s. It's hard to explain but I just have a sort of gravitational pull towards it.
  8. What color would you ever want to dye your hair?
    Magenta or purple.
  9. Have you ever visited NYC?
    Yes, for a JROTC drill competition in high school.
  10. What would you do if you had a million dollars?
    Invest in my future.
  11. If you were a character on a TV show, which one would you be?
    I have no idea.


    11 Blogs I've Awarded:
    (Click on the name to visit the blog!)


Saturday, October 20, 2012

turquoise gradient tutorial

Hey everyone! So just as an update, I still have a funky blue scalp but it's fading. I managed to part my hair and look normal enough to do another makeup look :)

Today's look:


Today I did a turquoise gradient. Please don't mind my awful eyebrows. I started filling them in brown then wanted them blue so I just did both, haha. They look terrible but oh well! I decided to do something a little different this time and put together a picture tutorial for you all. Hopefully this is helpful and instructive :D Sorry about the different lighting in the pictures, I was messing around with the settings on my camera. This look was actually inspired by the shirt I'm wearing. It's my awesome galaxy shirt I bought from Forever 21!


And here's my lovely half & half face for the tutorial, haha.


***LET'S GET STARTED!***


  • Step 1: After you prime your eyelid (I used Palladio herbal eye primer), outline the shape you want on your eye with a light colored eyeliner or eyebrow pencil. I suggest doing your foundation routine after the eyes are done in case of fallout. 

  • Step 2: Fill in the shape you outlined with a cream base, this will help the loose shadow I'm going to use stick on my lid. I used Maybelline color tattoo eyeshadow in "Tough As Taupe". I absolutely love these eyeshadows. They stay on all day and don't wear or slide off. An alternative to the color tattoos are NYX's jumbo pencils or MAC paint pots. Don't worry about covering the outline you made just yet, we'll go over it later with eyeshadow.
  • Step 3: Pat your first eyeshadow color on the inner third of your lid. I used "Daydream" loose eyeshadow by Concrete Minerals. An alternative to this color would be NYX's loose pearl eyeshadow in "Baby Blue". If you don't have loose eyeshadows or don't want to use them you don't have to. For this look any frosty, pearl baby blue color will work. 
  • Step 4: Pat your second eyeshadow color on the middle of your lid. Make sure to blend the color in with the first eyeshadow by gently overlapping the two where they meet. This will prevent any harsh lines from forming, leaving you with a beautiful blended look. For my second color I used "Mochi" pressed eyeshadow by Sugarpill Cosmetics but any light turquoise will do.

  • Step 5: Now pat the next eyeshadow color on the outer third of your lid completing your outlined shape (don't forget to blend the colors where they meet). I used "Jade" loose eyeshadow by Ben Nye. To recreate this exact look, you can use any dark, bold green. Don't worry about any fallout, you can get that later. 


  • Step 6: Take a black eyeshadow and outline the outer third of your design.
  • Step 7: Gently blend out the black little by little until it's blended in with the "Jade" eyeshadow. Get rid of any fallout.
  • Step 8: Line your upper lash line with black liquid eyeliner; you can also use gel liner if you prefer. Follow the design you made and draw a cat eye shape with the liner.
  • Step 9: Extend the eyeliner all the way down the top inner water line. Connect it with the bottom water line to make an inner cat eye point. 
  • Step 10: Line the entire bottom waterline with black eye liner. Add mascara to the top and bottom lashes and you're done!


Then you can complete your foundation routine if you decided not to at the beginning and you should have something like this: 


I hope you guy enjoyed this! Let me know if these tutorials are something you'd like me to do more of instead of just posting the final look of my makeup. 

Be bold and give this look a try! Then take a picture of it and leave it in the comment section below. I'd love to see how well everyone does! Don't like the colors? Use any three colors you want and create your own gradient!


What kind of look should I do next? What colors should I use?
Let me know!

Have a great weekend ;)

Ciao!

Eyes:
  • Palladio eye primer
  • Maybelline color tattoo eyeshadow "Tough As Taupe"
  • Concrete Minerals loose eyeshadow "Daydream" 
  • Sugarpill Cosmetics pressed eyeshadow "Mochi"
  • Ben Nye loose eyeshadow "Jade"
  • L'oreal infallible eyeshadow "Eternal Black"
  • wetnwild H20 proof liquid eyeliner "Ultra Black"
  • Urban Decay 24/7 glide on eye pencil "Perversion"
  • Maybelline the falsies volume express flared mascara "Blackest Black"
Cheeks:
  • NYX blush "Mocha"
Lips:
  • Kat Von D lipstick "Celebutard"
  • NYX pump it up lip plumper "Scarlett"
Face:
  • Bitch Slap! Cosmetics paramedical kamaflage foundation "Lite Olive Beige"
  • Bitch Slap! Cosmetics oil control blotting powder
  • Avon magiX illuminator
Brows:
  • Bitch Slap! Cosmetics brow quad "Dark"
  • Avon glimmersticks brow definer "Dark Brown"
  • Sugarpill Cosmetics pressed eyeshadow "Velocity"


Wednesday, October 17, 2012

a change in progress...

So I tried to dye my hair yesterday and it did not end well!

I tried to get my blue hair back. I went through the whole process, I even bleached my hair. But of course the hair dye was too dark so the only thing blue is my damn scalp. I'm pretty pissed off about it but what can you do. Due to how gross my scalp looks I am postponing further makeup looks until I fix this issue.

And yes I know you're not supposed to let the dye touch your scalp but I had my best friend dye my hair and well, shit happens. I probably would have gotten dye on my whole head if it weren't for her, haha. I hated the outcome so much that I didn't go out in public without a scarf on my head. I didn't even let my best friend Deej see it, haha. I'm going to try again though but this time I really have to go all out to get the desired color.

Don't worry, I got this.

Which of these 3 colors should I dye my hair?


Let me know what you think!

Click here to like my Facebook Page!


Ciao!

Monday, October 15, 2012

more swagger

Hey everyone! So I recently bought a sample pack from Swagger Cosmetics and I wanted to show you a look I created using some of the pigments. If you haven't made a purchase from Swagger or are unsure as to weather or not it's for you, I recommend you buy the sample pack like I did. It's only $3 and there's enough pigment in the samples for about 3-4 uses of each one you get. I know I did a post about Blake Karamazov previously but this post will do Blake much more justice. I didn't like the way the previous post turned out so I decided to once again recreate my image of Blake.


That's right, I even added freckles of my own this time! Haha, what do you think? Should I become a freckle girl myself? I think it's such a cute, doll-like trait. In other words, adorable!

This is what I received as my sample pack:

(Sorry you can't see "Responsitranity" well enough.)

I also got 3 business cards:

(Front of the card.)

(Back of the card.)

And here's an unclose look at my makeup:


For this look I used "Red Bone" and "Ghetto University on the lid then added a touch of "Rad Bitch" to the inner corner of the eye.

("Red Bone" pigment is on the outer and inner part of the lid and "Ghetto University" is on the middle of the lid.)


And that's the look! I love, love, loveeeeeee these pigments. I also have the HD finishing powder on my face which is fabulous; It really sets my foundation well. I can't wait to get my hands on all of those pigments and lip glosses too!

(Sassy, freckled biotch, hahaha.)

I also love the names of the pigments. They're so badass. Oh, and I have on my Beetlejuice jacket again. I'm really in love with it so I was just looking for an excuse to wear it again. 

Another thing I wanted to throw in here: I know I said before that I was looking to change my hair color again and I think I might go back to blue! Here's me with blue hair before:

(Hahahahahahaha, I'm sorry. I don't have any pictures that show my blue hair well enough so I just threw this in here, haha.)

No, but really, my hair was a nice dark blue before but I think I want a slightly brighter blue this time. I want to change it because I think it'll look awesome with the Dia De Los Muertos makeup for Halloween. I was also thinking about red (which I've already done a thousand times) or purple, but I've yet to decide...

Tell me what you guys think!
Red, blue or purple hair?
Do you like freckles?
Do you like pigments or pressed shadows better?
What Swagger product are you most interested in trying?
Tell me anything really!

But whatever you do, don't forget to like my Facebook page (if you already haven't) and TELL YOUR FRIENDS TO DO THE SAME!


(Kisses to everyone reading this!)

Ciao!

Eyes: 
  • Palladio eye primer
  • Maybelline color tattoo eyeshadow "Tough As Taupe"
  • Swagger Cosmetics pigment "Red Bone"
  • Swagger Cosmetics pigment "Ghetto University"
  • Swagger Cosmetics pigment "Rad Bitch"
  • Maybelline eye studio gel liner "Blackest Black"
  • MAC Cosmetics eyeshadow "Brule"
  • Maybelline the falsies volume express flared mascara "Blackest Black"
Cheeks: Nothing

Lips:
  • Kat Von D lipstick "Vestalula" 
Face:
  • Bitch Slap! Cosmetics paramedical kamaflage foundation "Lite Olive Beige"
  • Avon magiX illuminator
  • Swagger Cosmetics "HD Finishing Powder"
Brows:
  • Bitch Slap! Cosmetics brow quad "Dark"
  • Avon glimmersticks brow definer "Dark Brown"

Thursday, October 11, 2012

hello kiss

Good morning
to the lips
carved from glaciers,
sending a chill
deep inside
this temple,
this body.
Frozen is my
heart that you've
engulfed
with your touch.
Warmth
beneath the ice,
a kiss
is the price.
So pure, so
honest.
A pair
of lips
speaking a language
only two
can understand.
This
is a chill
that will be
the death of
me.
Hello kiss.
Welcome home,
bliss.


Ciao!


Wednesday, October 10, 2012

new stuff

Hey everyone! So yesterday I went to the mall because I had to go shopping for a dress to wear to Joe's sister's wedding.  I took a bus the whole way and let me just say that DAMN I was tired when I got home! Haha, but any who. Here's the dress I bought:


I tried taking a picture of it in the mirror but the flash ruined it. I bought the dress from Forever 21. Here's a picture of what it looks like from the site:


It's such a gorgeous dress and so cheap! I also bought a blazer to wear with it. I didn't take a picture of it on but here's the photo from online:


I look pretty dynamite in everything I bought, haha. It was a pretty good shopping experience. Here are a couple other things I bought:


I got this flask from ICING. As I was walking out I spotted a Marilyn Monroe one and was instantly disappointed that I didn't see it sooner! But I do love animal print and it's glittery so I guess it's still quite a gem :)


This bracelet is also from ICING. I bought it to match the outfit for the wedding. I can't wait to dress up!

But that's all for my shopping spree. The wedding is Saturday and I'll try to blog my makeup for that day too :)


Have you gone on any shopping sprees lately? 

Let me know!

Ciao!

Tuesday, October 9, 2012

black swan

Hello hello!

Just as the title states, I decided to do the look from the movie Black Swan. Here's the original look:


Now I'm no Natalie Portman but I tried anyway. Now originally I was going to do a sugar skull look but then I decided to do this instead. By the time I made that decision though, I already put a white base ALL OVER my face, haha. The actual look has white on mainly just the upper half then it blends out to a fair foundation. Let's just pretend I did that okay?

(I cropped out my lips because I didn't have a lipstick color that matched and that pissed me off...)


I was going to fill the inside in with blues and purples but I wanted to use cream liner all throughout and all I had was silver. I edited the eyes to change the color :)


I guess you could call this my first Halloween look. I was so excited to use the Ben Nye Clown White base I just bought. It's going to be perfect for the sugar skull looks I'll be doing for Halloween. Joe, Deej, my friend Chris and I are all going to be sugar skull amigos! I'll have a lot of work to do that day; I'm tired just thinking about it, ha.

This is the aftermath of me trying to wash all of this off in the shower:


Que lastima! ( That means 'what a shame' in Spanish)

I should have done a zombie look right after.

Well, that's all for today. Hope you all enjoyed it. What are your costume plans for Halloween?


Ciao!

Eyes:
  • Maybelline eye studio gel liner "Blackest Black"
  • Maybelline color tattoo eyeshadow "Tough As Taupe"
  • Taylor Made pigment "Pistol"
  • Urban Decay 24/7 glide on eye pencil "Perversion"
  • Maybelline the falsies volume express flared mascara "Blackest Black"
Face:
  • Ben Nye "Clown White"
  • Ben Nye face powder "Super White"