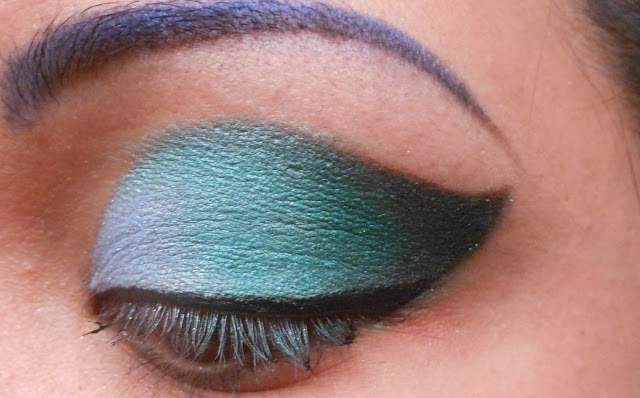
Today's look:
Today I did a turquoise gradient. Please don't mind my awful eyebrows. I started filling them in brown then wanted them blue so I just did both, haha. They look terrible but oh well! I decided to do something a little different this time and put together a picture tutorial for you all. Hopefully this is helpful and instructive :D Sorry about the different lighting in the pictures, I was messing around with the settings on my camera. This look was actually inspired by the shirt I'm wearing. It's my awesome galaxy shirt I bought from Forever 21!
And here's my lovely half & half face for the tutorial, haha.
***LET'S GET STARTED!***
- Step 1: After you prime your eyelid (I used Palladio herbal eye primer), outline the shape you want on your eye with a light colored eyeliner or eyebrow pencil. I suggest doing your foundation routine after the eyes are done in case of fallout.
- Step 2: Fill in the shape you outlined with a cream base, this will help the loose shadow I'm going to use stick on my lid. I used Maybelline color tattoo eyeshadow in "Tough As Taupe". I absolutely love these eyeshadows. They stay on all day and don't wear or slide off. An alternative to the color tattoos are NYX's jumbo pencils or MAC paint pots. Don't worry about covering the outline you made just yet, we'll go over it later with eyeshadow.
- Step 3: Pat your first eyeshadow color on the inner third of your lid. I used "Daydream" loose eyeshadow by Concrete Minerals. An alternative to this color would be NYX's loose pearl eyeshadow in "Baby Blue". If you don't have loose eyeshadows or don't want to use them you don't have to. For this look any frosty, pearl baby blue color will work.
- Step 4: Pat your second eyeshadow color on the middle of your lid. Make sure to blend the color in with the first eyeshadow by gently overlapping the two where they meet. This will prevent any harsh lines from forming, leaving you with a beautiful blended look. For my second color I used "Mochi" pressed eyeshadow by Sugarpill Cosmetics but any light turquoise will do.
- Step 5: Now pat the next eyeshadow color on the outer third of your lid completing your outlined shape (don't forget to blend the colors where they meet). I used "Jade" loose eyeshadow by Ben Nye. To recreate this exact look, you can use any dark, bold green. Don't worry about any fallout, you can get that later.
- Step 6: Take a black eyeshadow and outline the outer third of your design.
- Step 7: Gently blend out the black little by little until it's blended in with the "Jade" eyeshadow. Get rid of any fallout.
- Step 8: Line your upper lash line with black liquid eyeliner; you can also use gel liner if you prefer. Follow the design you made and draw a cat eye shape with the liner.
- Step 9: Extend the eyeliner all the way down the top inner water line. Connect it with the bottom water line to make an inner cat eye point.
- Step 10: Line the entire bottom waterline with black eye liner. Add mascara to the top and bottom lashes and you're done!
Then you can complete your foundation routine if you decided not to at the beginning and you should have something like this:
I hope you guy enjoyed this! Let me know if these tutorials are something you'd like me to do more of instead of just posting the final look of my makeup.
Be bold and give this look a try! Then take a picture of it and leave it in the comment section below. I'd love to see how well everyone does! Don't like the colors? Use any three colors you want and create your own gradient!
What kind of look should I do next? What colors should I use?
Let me know!
Have a great weekend ;)
Ciao!
Eyes:
- Palladio eye primer
- Maybelline color tattoo eyeshadow "Tough As Taupe"
- Concrete Minerals loose eyeshadow "Daydream"
- Sugarpill Cosmetics pressed eyeshadow "Mochi"
- Ben Nye loose eyeshadow "Jade"
- L'oreal infallible eyeshadow "Eternal Black"
- wetnwild H20 proof liquid eyeliner "Ultra Black"
- Urban Decay 24/7 glide on eye pencil "Perversion"
- Maybelline the falsies volume express flared mascara "Blackest Black"
Cheeks:
- NYX blush "Mocha"
Lips:
- Kat Von D lipstick "Celebutard"
- NYX pump it up lip plumper "Scarlett"
Face:
- Bitch Slap! Cosmetics paramedical kamaflage foundation "Lite Olive Beige"
- Bitch Slap! Cosmetics oil control blotting powder
- Avon magiX illuminator
Brows:
- Bitch Slap! Cosmetics brow quad "Dark"
- Avon glimmersticks brow definer "Dark Brown"
- Sugarpill Cosmetics pressed eyeshadow "Velocity"


No comments:
Post a Comment