Saturday, January 19, 2013

colorful cheetah tutorial

Hey everyone! So today I've put together a picture tutorial for you all. Let's get right to it!

Here's the look:


If you like this look then be sure to read on for the tutorial! Also, make sure you like my Facebook page. If you already have, then tell your friends to like it instead!


***Please pay no mind to my eyebrows, I'm growing them out.

...again.


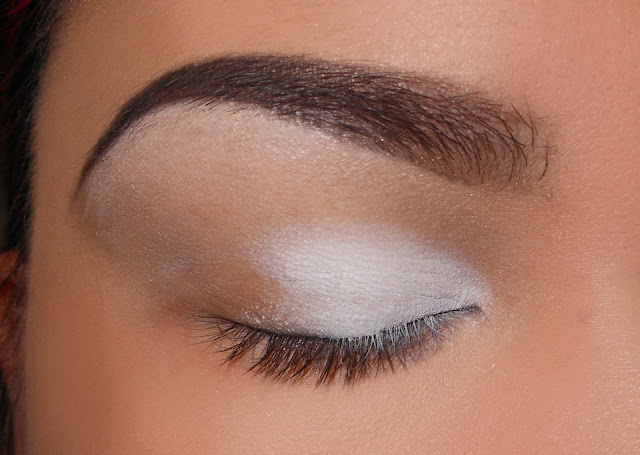
  • Step 1: After priming your eyes, take a matte white eyeshadow and apply it to the inner two-thirds of your lid.

  • Step 2: Take the second color and apply it to the outer third of your lid and blend it with the white where they meet. For this look, any turquoise color will suffice. If you want to know the exact products I used for this look, I always list them at the bottom of my post.


  • Step 3: Next, take that same turquoise color and apply it to the crease, above the two eyeshadows you just applied.

  • Step 4: Take a light, shimmer eyeshadow to use as a highlight and apply it right underneath your brow. Blend it down into the turquoise eyeshadow to get rid of any harsh lines.


  • Step 5: Apply eyeliner above the lash line and wing it out.


  • Step 6: Apply a metallic or shimmer blue eyeshadow on top of the black eyeliner. I only put it on the middle of the liner because I didn't want the whole thing to be blue.

  • Step 7: Here I just took a small piece of lace and put it over my eye, then with a fluffy brush I applied purple eyeshadow so it would have this messy, splotchy look. You can just dab on purple shadow here and there, it's okay if it's not perfect. It just gives a nice background effect to the cheetah print. Keep the purple on the outer half of the eye.

  • Step 8: Using liquid eyeliner, start to draw your cheetah spots. You can look up a picture for reference if you need it. I just did little parenthesis and circles in all different sizes.

Then you should get something like this:


  • Step 9: Apply eyeshadow along the bottom lash line and wing it out next to the top winged liner. I used a purple and blue eyeshadow to achieve this color. Next, put a highlight color on the inner corner of your eyes, add your mascara and you're all done!

The finished look:


I hope you all enjoyed this picture tutorial. Leave a comment and let me know what you think!

Have any makeup looks you'd like me to show you? Just let me know!


Ciao!


Eyes: 
  • Too Faced Shadow Insurance eye primer
  • Sugarpill Cosmetics pressed eyeshadow "Tako"
  • Sugarpill Cosmetics pressed eyeshadow "Mochi"
  • Sugarpill Cosmetics pressed eyeshadow "2am"
  • Too Faced eyeshadow "Cop A Teal"
  • Too Faced eyeshadow "Marshmallow"
  • Swagger Cosmetics pigment "Rad Bitch"
  • Urban Decay 24/7 glide on pencil "Ransom"
  • Palladio liquid eyeliner "Black"
  • Femme Couture XXL Monster Lash mega volume mascara
Cheeks:
  • NYX blush "Mocha"
Lips:
  • NYX pump it up lip plumper "Scarlett"
Face:
  • Make Up For Ever 5 camouflage cream palette "No. 1"
  • Make Up For Ever Mat Velvet+ mutinying foundation "No. 45 - Soft Beige"
  • Too Faced "Exclusive Bronzer" from Sweet Indulgence palette
Brows:
  • Bitch Slap! Cosmetics brow quad "Dark"


Saturday, January 12, 2013

make your eyes look bigger

Heyyyyyyyyyy :)

Back to the blog I go!

My cousin Nicole asked me to do a post that would show her how to make small eyes appear larger so I'm going to let you guys in on some tips to help you achieve that effect.

I didn't do a tutorial but I did do a makeup look that would show you an example of what these tips can do for you.

Helpful Tips:
  • Use light eyeshadows and shimmer eyeshadows on your lid. Lighter colors will make the eye appear larger than darker colors would. Shimmery eyeshadows are great because they reflect well with light.
  • Apply white liner to the inner rim of your bottom lash line. This will give the illusion that the white part of your eye extends out father than it actually does.
  • Curl your lashes and use mascara! Longer lashes give a striking vertical illusion, drawing the eye upward. 
  • Groom your brows! Shaping your eyebrows and removing hairs can free up some space around the eye area, especially if you arch your brows. The more space around your eye, the larger it appears to be.
Those four tips are the main things that help me get the appearance of a larger eye. Now Im going to show you a makeup look I did using those tips, displaying a before and after.


If you look at the picture the right side appears to have a larger eye than the left, all with the help of makeup! The results aren't extremely drastic but they do help.

Here's the look with both eyes done:


As you can see, using lighter colors instantly widens the eye area. You know how they say black is slimming and white is the opposite? Well, the same concept applies here. Just as using white liner will help widen the eye area, black will make your eyes appear smaller. Now this doesn't mean you can't use black liner, just keep it away from your lower waterline. If you love black eyeliner as much as I do and feel you just have to have it on, apply it along the upper lash line. If you look closely you can see that I only applied black eyeliner on the outer third of the lash line. Applying liner that way keeps the inner two-thirds of your lid open while still adding depth from the black at the end. This same rule apples to darker eyeshadows. If you're going to use dark colors, keep them on the outer third of your lid.

Under the waterline I added some light brown shadow to my lower lid for dimension. I also did the same on the top lid in the crease towards the outer half of my lid. Don't be afraid to pair different light colors together. Doing so can also add dimension to your eyes, especially when using two colors of the same hue. For example, on the inner two-thirds of my eyelids I used a pale pink then on the outer half I used a baby pink. You can do this with blues, greens, purples or any other colors you'd like.

I also applied mascara to the bottom lashes. Doing so isn't necessary but I think it adds length to the bottom of the eye just as it does the top.

That's pretty much the gist of it all. I hope this post helps anyone reading this. If you have any questions or comments, please submit them below.

Also, if you haven't liked my Facebook page yet you can do so by clicking on the link below. Tell your friends!


Leave me some more blog post suggestions below.

Talk to you guys soon :)


Ciao!


Eyes:
  • Too Faced Shadow Insurance eye primer
  • Too Faced eyeshadow "Satin Sheets"
  • Too Faced eyeshadow "Gum Drop"
  • Too Faced eyeshadow "Teddy Bear"
  • Too Faced eyeshadow "Lovey Dovey"
  • Sugarpill Cosmetics pressed eyeshadow "Tako"
  • Palladio liquid eyeliner "Black"
  • Femme Couture XXL Monster Lash mega volume mascara
Cheeks:
  • NYX blush "Mocha"
  • Too Faced "Candlelight Glow" from Sweet Indulgence palette
Lips:
  • NYX pump it up lip plumper "Scarlett"
Face:
  • Make Up For Ever 5 camouflage cream palette "No. 1"
  • Make Up For Ever Mat Velvet+ mutinying foundation "No. 45 - Soft Beige"
  • Too Faced "Exclusive Bronzer" from Sweet Indulgence palette
Brows:
  • Bitch Slap! Cosmetics brow quad "Dark"
  • Make Up For Ever 5 camouflage cream palette "No. 1"


Monday, December 10, 2012

hair hair hair

How goes it everyone?

So I'm sure some of you know that I've recently started beauty school. I haven't done many post about the things I've been doing at school because for the entire first month all we did was spa stuff: Basic manicures, artificial nails, pedicures and facials. It was fun for a while but I'm glad to say we are finally moving on.

The first thing we learned to do was a blunt cut. I cut two of my mannequin heads and then my "beauty school babe" Lisa entrusted her hair to me. :)

I cut her hair and I'd just like to say that she is alright!!!
Haha.

(Me cutting Lisa's hair.)

Cutting hair on a mannequin is not the same as cutting someone's actual hair, especially if they have long ass hair like Lisa does. You have to pay mind to their shoulders and head movements. It took me a moment to get used to it all but I gave her a nice cut overall.

:)

I believe the blunt cut is the only cut we'll be learning for now. We have to wait another month or two before we learn a different technique but that's alright. After the blunt cut we learned how to use rollers and how to do pin curls.

(Left: rollers. Right: pin curls. Both photos taken from Google images.)

I actually enjoy doing pin curls and rollers. We also learned how to do finger waving which I think is awesome. I can finally get that 1920s hollywood hair I love so much! 

Hair is definitely becoming a new love of mine. 

(Finger waves on short hair.)

(Finger waves on long hair.)

We also learned a few up-dos at school but I was too busy finger waving to pay attention. I ended up going to a function at the Boulevard Mall to promote our school and we had a choice to do either nails or hair for passerby's. I chose hair and then immediately regretted it. I didn't know any up-dos at all! This little girl wanted her hair shaped like a bow and I immediately forgot how to do it even though I was shown how to only 10 minutes before, haha. I french braided her hair instead and then headed over to the nail table instead; More people wanted their nails painted anyway. It bugged me though that I couldn't give this little girl the style she wanted so I decided to go home and practice a few up-dos on my own time.

Of course I learned how to do the bow thing, haha.


I also learned how to do this braided up-do by doing half french braids on each side of the head.


(Front view of braided up-do.)

(Top-front view of braided up-do.)

(Side view of braided up-do.)

(Rear view of braided up-do.)

To learn how to do this up-do, I watched this youtube video by Bebexo:


She does really wonderful tutorials so if you're looking for hair ideas, check out her youtube channel.

That's pretty much all I've been up to at school. What kind of hair styles would you like me to try?

Stay tuned for another makeup look this week! 


Ciao everyone!

Sunday, December 2, 2012

'tis the season (tutorial)

Hello everyone! Today I put together another picture tutorial for you all :) It's December and I've got the holiday spirit so I created this look using traditional Christmas colors. Enjoy!!!


***LET'S GET STARTED!***

  • Step 1: First I'm going to show you how I did the glitter brow. I decided to do red eyebrows to keep the Christmas theme but if that's too much for you can do your brows as you normally do :) Using a red eyeliner pencil, outline the shape of your brow.
  • Step 2: Now fill in your brow with the red pencil or red eyeshadow.
  • Step 3: I used my NYX glitterati glitter cream palette for the glitter. Just pat the glitter on over your brow. If you want, you can use glitter adhesive to make it stick better. I chose gold glitter to break apart the red a bit.
  • Step 4: Now let's get started on the eyes. After priming your lid, use a small piece of tape and place it on the side of your eye. This will help you create a clean line at the edge of your eye when you apply eyeshadow. To prevent harsh tugging when you remove the tape, stick it on your hand a couple of times before you apply it near your eye. You want the tape sticky but not enough to pull on the skin when you remove it. 
  • Step 5: Using a flat stiff brush, pat on green eyeshadow on the outer half of the lid. Keep applying and patting the color on until it's a nice deep green.

  • Step 6: Using the same brush, apply the same green eyeshadow on the inner half of your lid. I want the green to show a but under the gold color we're about to apply so I brought the green in a bit towards the middle. Don't worry if it looks messy right now, it'll look better when you blend the two colors you're using together. 
  • Step 7: Continuing with the same brush (clean off the green first though), take a gold color and apply it on the middle of the lid. Blend the gold in with the green around it.
  • Step 8: The messy part is over so now we can remove the tape! Gently peel off the tape and toss it in the garbage. Clean off any fallout that's on your skin.
  • Step 9: Using the same flat stiff brush you've been using, blend the top of the eyeshadow so it doesn't have such a harsh line. To blend, use gentle strokes going back and forth along the edge of the eye shadow.


When you're done blending, you should have something like this.
  • Step 10: Again, using the same brush, take the same green you've been using and run it along your bottom lid.
  • Step 11: Line your water line with black eyeliner. You can line your top waterline if you want as well. Applying eyeliner to the top waterline can give the illusion of thicker lashes.

  • Step 12: Line the top of your lid with black liquid eyeliner. You can use gel eyeliner if you prefer.

  • Step 13: Using your liquid eyeliner, draw a line along the free edge of your eye where you removed the tape. This will help you create the perfect cat eye.
  • Step 14: Now join the line you just made with the eyeliner on your lid. The eyeliner should meet at the highest point of the line you just drew. 

Once you've got your eyeliner on, just add mascara and you're all set! If you'd like, you can apply false eyelashes at this time as well. 


And that's my holiday look! What do you guys think? I hope everyone is enjoying my picture tutorial method and I hope it helps in your makeup application. This look is a fun look for the holidays, don't you agree?


I'm seriously thinking of rocking colored brows for Christmas. Speaking of brows, I just groomed my mother's caterpillars today, haha. But they turned out great! If you liked my page on Facebook you can see the pictures I posted on my wall earlier. 


But just for the heck of it I'll put the pictures on here as well.

Here's a before and after photo of her brows. The left is done, the right is not.


After I was done tweezing her brows, I filled them in for her.


And that's not all! I also did her makeup. This is the first time I've ever seen her with foundation on and I think she just looks so fabulous here!!!


She's just too gorgeous isn't she? Now you all know where I get my good looks from, haha. But really, I've been meaning to do my mom's eyebrows for a while now and they were definitely long overdue. I'm glad I got to pamper her a bit today though. It was fun dolling her up :) Love you momma!

But that's all folks! Hope you enjoyed this post. What holiday looks have you come up with? Leave a comment for me and don't forget to tell your friends!


Ciao!